
Want to put your face into another photo without the result looking obviously edited? The secret to a realistic face swap is choosing compatible photos, matching facial angles and lighting, and checking the finished image for unnatural details.
With SwapThisFace, you can swap faces between two photos directly in your browser, without Photoshop or manual masking. In this guide, we'll show you how to make a face swap look realistic using our photo editor, along with practical tips for improving your results.
1. Choose the Right Photos for a Realistic Face Swap
Before you open the SwapThisFace editor, start by choosing two compatible photographs.
SwapThisFace works with two inputs:
- Source photo: A selfie or portrait containing the face you want to use.
- Target photo: The photograph where you want your face to appear.
For example, imagine you have a selfie and want to recreate a beautiful travel portrait. Your selfie becomes the source, while the travel portrait becomes the target.
SwapThisFace uses the source face and the target scene to create a new image.
Choose a clear source selfie
For a natural-looking face swap, we recommend using a selfie where:
- Your face is clearly visible and in focus.
- You're looking directly at the camera or at a slight angle.
- Your eyes, nose, and mouth are unobstructed.
- Lighting is reasonably even across your face.
- You're not wearing sunglasses or using heavy beauty filters.
A well-lit selfie provides useful facial detail for the swapping process.
Match your target photo
Your target matters just as much as your selfie.
Suppose your target is a professional portrait where the person is looking straight toward the camera. A front-facing source selfie will usually be a better starting point than a photograph where you're looking sharply sideways.
Try to match the head angle, facial expression, and lighting as closely as practical.
SwapThisFace tip: Choose a target with one clearly visible face. Our current photo editor is designed for single-face swaps, not group face mapping.
2. Generate Your First Face Swap with SwapThisFace
Once you've selected your photos, you're ready to create your first result.
Open the SwapThisFace photo editor.
Upload your source photo
In the section labeled Your face, upload the selfie or portrait containing the face you want to use.
SwapThisFace accepts JPG, PNG, and WebP images up to 10 MB each.
If your iPhone saves pictures in HEIC format, export the image to a supported format before uploading.
Upload your target photo
Next, find the section labeled Your new look.
Upload the photograph you want to recreate with your face.
This could be a travel portrait, a professional-looking headshot, a stylish outfit photograph, or another single-person scene you have permission to edit.
The target image determines the composition, setting, and pose you're trying to recreate.
Create your result
Click Swap my face to generate your image.
Once processing finishes, review your result in the editor. You can compare it with the original target and download a version you're happy with.
You don't need to manually cut out faces, draw masks, or blend layers.
Try the SwapThisFace Photo Editor →
3. Review Your Result: Face, Edges, and Lighting
Your first face swap gives you a starting point. Before downloading it, take a moment to check whether the new face looks like it naturally belongs in the photograph.
Here are the details we recommend reviewing.
Does the face actually look like you?
Compare the generated image with your original selfie.
Look at your eyes, nose, mouth, and overall facial proportions.
A successful result should preserve recognizable features from your source photo while fitting them into the target scene.
If the new face looks noticeably different, try a clearer source selfie or one with a more compatible facial expression.
Check the hairline and facial edges
The boundary between the face and its surroundings is an important detail.
Zoom in and check the jawline, cheeks, forehead, and hairline for unnatural transitions.
Pay extra attention when the target includes hair crossing the face, strong shadows, or accessories near the cheeks.
These details can make an otherwise convincing result look artificial.
Does the lighting match?
Imagine your target is a warm, sunset portrait, but your selfie was taken under harsh, cool indoor lighting.
That difference can make the result more challenging.
Look at the direction of the light, the shadows around the nose and cheeks, and the relationship between the face and neck.
If the face looks too bright or doesn't fit the surrounding scene, consider using a source photo with lighting closer to the target.
SwapThisFace doesn't currently provide separate manual lighting or skin-tone adjustment sliders. Choosing compatible photos is your main way to improve the starting conditions.
For a deeper visual checklist, visit our realistic face swap guide.
4. Improve Face Swap Quality by Changing One Photo
What if your first result doesn't look realistic enough?
You don't necessarily need a different tool or advanced editing software. Sometimes changing one of your input photos can produce a more satisfying result.
The key is to change one photo at a time.
Try a different source selfie
Keep your target photo unchanged and upload another selfie.
For example, if your original selfie was taken from a low angle, try one captured at eye level.
If your target is smiling, choose a selfie where your expression is more similar.
Generate another face swap with SwapThisFace and compare both outputs.
Ask yourself:
- Which result preserves my facial features more naturally?
- Which one has better-looking eyes and mouth?
- Does the skin appear consistent with the target?
- Are the face edges less noticeable?
This makes it easier to identify which change may have helped.
Try a different target photo
If multiple suitable selfies still produce an unnatural result, the target may be the problem.
Choose another photograph with a more compatible camera angle, clearer facial details, or simpler lighting.
Remember that the target controls more than the background. It also determines the pose, outfit, and surrounding composition.
If you want to try a different setting or outfit, selecting another target is the practical approach in SwapThisFace.
Compare against real examples
Want to see how the same source face can work across different scenes?
Visit our face swap examples gallery.
You'll find previously published source, target, and result images from coastal, Paris, and city café scenes.
These are existing examples, not newly conducted benchmark tests. Use them to understand what to inspect when comparing facial detail, lighting, and composition. Your own results will depend on your photos.
5. Tips for More Natural-Looking Face Swaps
If your goal is to improve face swap quality consistently, keep these practical guidelines in mind.
Match facial expressions
A neutral selfie paired with an exaggerated laughing expression can be more difficult than two photos with similar expressions.
For a smiling target, try a smiling source. For a serious portrait, start with a more relaxed or neutral selfie.
Use photos with natural detail
A higher-resolution photograph isn't automatically better.
A clear portrait with visible facial features may be more useful than a very large image where the face is tiny, blurry, or partly hidden.
Avoid excessively sharpened, heavily filtered, or highly compressed screenshots where possible.
Keep the face unobstructed
Sunglasses, hands, hair, or other objects covering important facial features may make the swap more difficult.
Start with photographs where both faces are easy to see.
Keep the lighting reasonably similar
You don't need identical studio lighting.
However, choosing photographs with compatible brightness, shadow direction, and color temperature can help the finished face look more consistent with the scene.
Inspect the full-size result
A face swap may look convincing in a small preview while showing unusual details when enlarged.
Check the result at normal viewing size and then inspect the eyes, mouth, jawline, and hairline more closely.
6. When Should You Choose a Different Target Photo?
Some photographs are simply more challenging for automated face swapping than others.
For example, a target image may have:
- A face turned almost completely sideways.
- Strong shadows covering one side of the face.
- Hair or accessories hiding facial features.
- Motion blur or very low image quality.
- A tiny face within a large scene.
If you've tried several clear source selfies and the results still look unnatural, consider changing the target.
For your first attempts with SwapThisFace, we recommend a clear, single-person portrait with visible facial features and relatively even lighting.
Once you're comfortable evaluating results, you can experiment with more challenging angles and scenes.
Keep in mind that face swap quality depends on both your chosen photos and the processing model. No particular result is guaranteed.
7. Keep the selfie and compare two target photos
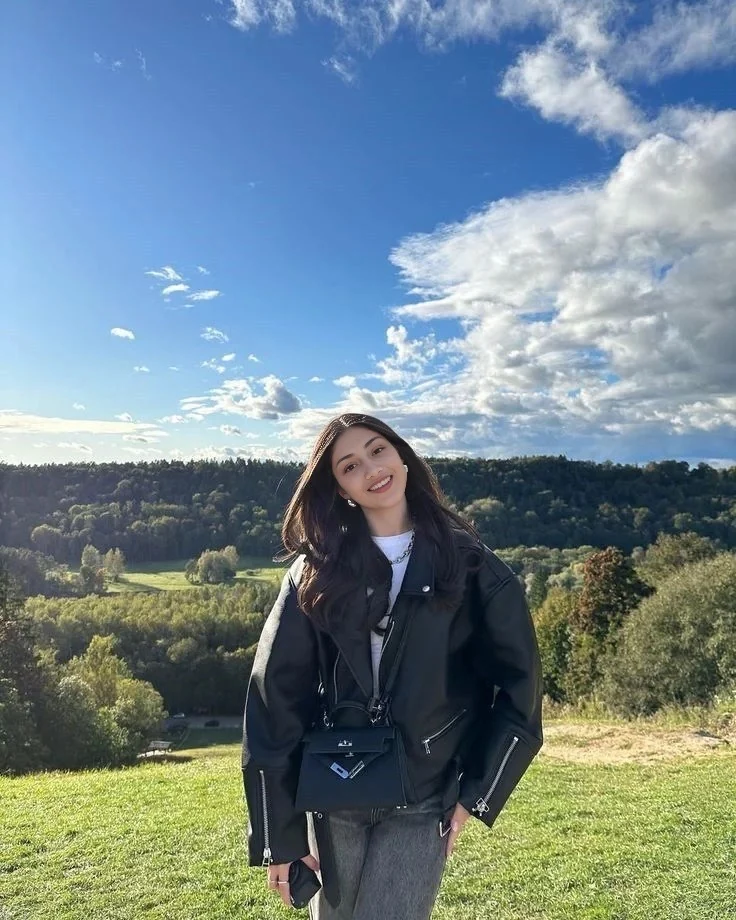
These swaps use the same source selfie. Open the hillside source, target and result side by side. In the wide shot, the sky and hills take up much of the frame. Zoom in until you can see both eyes, then compare the tilt of the mouth with the original target. A convincing landscape can distract you from a face that needs another look.
Now open the woodland comparison. The face occupies more of the frame, but the subject is looking back over one shoulder. Trace the cheek beside the scarf and compare the visible eye with the source. Here the boundary is easier to inspect, while the turned head makes a straight-on comparison harder.
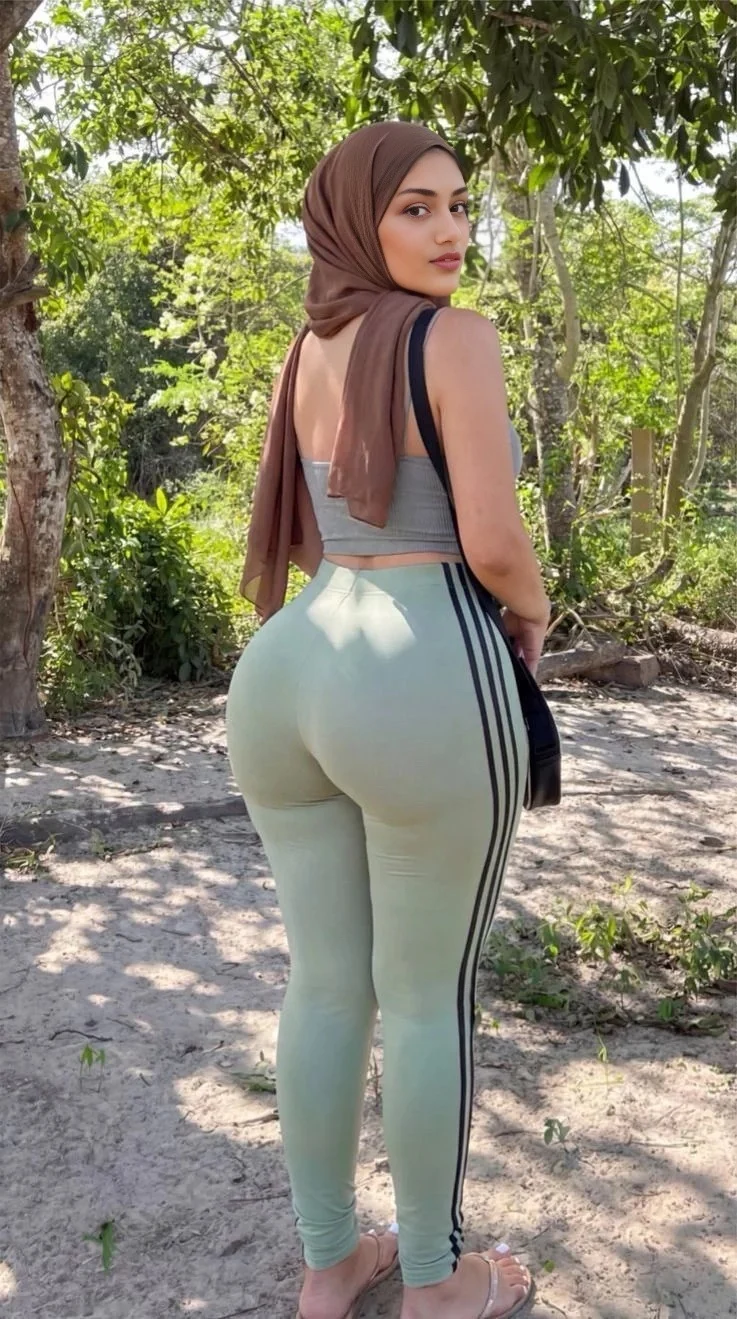
Try this with your own pair: decide whether the detail you want to judge is actually visible in the target. If the eyes are too small to compare, change the framing. If one cheek disappears behind a scarf, choose a target with a clearer outline before changing your selfie.
Frequently Asked Questions
How can I make a face swap look realistic with SwapThisFace?
Upload a clear selfie and a target photo with similar facial angles, expressions, and lighting. Generate your image in the SwapThisFace editor, then review the facial identity, eyes, edges, and shadows. If something looks unnatural, change one input photo and compare the new result.
Which photo should I change first?
Usually, start with your source selfie while keeping the target unchanged. A clearer selfie with better lighting or a more compatible face angle may help. If multiple suitable selfies struggle with the same target, try replacing the target photograph instead.
Does a sharper photo always produce a better face swap?
Not necessarily. Sharpness helps, but a highly detailed photo with an incompatible facial angle or heavy shadows may still produce a difficult result. Prioritize clear, unobstructed facial features, natural lighting, and compatible poses over resolution alone.
Can I fix a face swap without manual editing?
Yes, some problems can be improved by choosing a different source or target and generating a new result. SwapThisFace lets you do this without Photoshop or manual masking, although it doesn't provide individual retouching sliders. More difficult photos may still require external editing or a different image pair.
Can I use SwapThisFace on my phone?
Yes. SwapThisFace works in mobile browsers on iPhone and Android, as well as desktop browsers. Upload supported JPG, PNG, or WebP photos directly from your device without installing a separate app.
Final Thoughts: Make Your Next Face Swap Look More Natural
A realistic face swap isn't just about putting one face onto another photograph. The details matter: facial angles, lighting, expressions, image clarity, and how naturally the new face fits the scene.
With SwapThisFace, you can experiment with different source and target images, review your results, and discover which combinations work best.
Start with a clear selfie, choose a compatible target, and make one adjustment at a time if your first result needs improvement.
Ready to Create Your Own Realistic Face Swap?
Bring two photos and see how they work together.
Open SwapThisFace — Start Face Swapping
SwapThisFace offers one successful guest swap without creating an account. Continued use requires credits through an available plan or credit pack.
Only upload photos you have permission to use, including permission from the people pictured. Be transparent about edited images when they could otherwise mislead viewers.